Introduction
Welcome to the turn based strategy game Corridor Quest, a fun game that invites you to think!
The game is loosely based on the game of Quoridor but it deviates enough from it to call it a unique game by itself which is why I gave it a different name. The game is what the name suggests: You need to find your way through corridors to reach your goal and win the game. It is classified as a turn-based strategy game.
Like with chess, the game is designed to let you think about your next move for quite some time. This is called correspondence mode playing: People go about their business and when they have time and know what their next step in the game will be, they make an update.
The documentation has been set up in five main sections (see left bar):
- For New users. How to install the game.
- For Players. What are the game rules and how to play the game.
- For Spectators. How to watch others play the game.
- For Administrators. How to install and maintain your own game server.
- For Contributors. How to contribute to this project.
Why did I make this?
This is a pure hobby project. It started out as a way to learn the programming language rust, but it has gradually grown into larger and larger endeavors like learning restfull API design, cloud native services, client-server design, token based auth, CI/CD pipelines, Community building, etc, etc.
I developed a CLI client first and, at the time of writing, I plan to make a WEB client as well. No more though! This is because I believe these are the two ultimate interfaces that are needed. I still believe in the Web as the ultimate graphical user interface and I will stand by this believe to refuse to make mobile and/or gui clients for the various platforms out there. If you don't agree, I do not care. I invite you to scratch your own itch.
Is it over engineered? Hell yes! But if was a lot of fun!!
Have fun playing it
Fred
Installation
Only the CLI client needs installation. It is available for Linux, MacOS, and Windows.
Linux
Fedora / RHEL / Rocky / Alma
Add the Corridor Quest repository:
sudo curl -o /etc/yum.repos.d/corridor-quest.repo \
  https://docs.corridor-quest.net/corridor-quest.repo
Install the client:
sudo dnf install cq
openSUSE / SLES
Add the Corridor Quest repository:
sudo curl -o /etc/zypp/repos.d/corridor-quest.repo \
  https://docs.corridor-quest.net/corridor-quest.repo
Install the client:
sudo zypper refresh
sudo zypper install cq
Debian / Ubuntu
Add the repository:
sudo curl -o /etc/apt/sources.list.d/corridor-quest.list \
  https://docs.corridor-quest.net/corridor-quest.list
Install the client:
sudo apt update
sudo apt install cq
Other distributions
Download and extract the tarball for your architecture:
x86_64:
curl -Lo cq.tar.gz https://codeberg.org/api/packages/corridor-quest/generic/cq/latest/cq-linux-x86_64.tar.gz
tar -xzf cq.tar.gz
sudo mv cq-*/cq /usr/local/bin/
arm64:
curl -Lo cq.tar.gz https://codeberg.org/api/packages/corridor-quest/generic/cq/latest/cq-linux-arm64.tar.gz
tar -xzf cq.tar.gz
sudo mv cq-*/cq /usr/local/bin/
Shell completions (optional):
For Bash:
cq completions bash | sudo tee /etc/bash_completion.d/cq > /dev/null
For Zsh (add to ~/.zshrc):
echo 'eval "$(cq completions zsh)"' >> ~/.zshrc
For Fish:
cq completions fish | sudo tee /usr/share/fish/vendor_completions.d/cq.fish > /dev/null
MacOS (Homebrew)
Add the Corridor Quest tap and install:
brew tap corridor-quest/tap https://codeberg.org/corridor-quest/homebrew-tap
brew install cq
To update:
brew update && brew upgrade cq
Windows (8+)
Download and run the installer in PowerShell:
curl.exe -Lo cq.zip https://codeberg.org/api/packages/corridor-quest/generic/cq/latest/cq-windows-x86_64.zip
Expand-Archive cq.zip -DestinationPath cq-install
cd cq-install\cq-*
.\install.ps1
note
Windows 7 users should download the zip manually and run install.ps1 from PowerShell.
Verify installation
To verify proper installation enter these commands in a terminal session:
cq --version
cq --help
Support
This is an Open Source hobby project. It is completly free to use. The consequence of this is that support is not the same as from some vendor of a commercial product. There is no SLA.
That being said, here are some pointers for getting help
Discord
I have a discord server where you can discuss things.
Issues
I you find an issue -> please file an issue. We use a github like issue system.
- For issues in the documentations go here
- For issues in the CLI Client go here
- For issues in the Server go here
For issues you do not know where to file them -> regard them as Server issues.
Contribute
If you want to contribute to fix issues, great! We welcome this. Go here for guidance.
Game Rules
As mentioned in the intro, the game is heavily inspired by the game of Quoridor. The basic game rules are more or less the same. See the wikipedia page on Quoridor for background. The game rules are enforced by the system.
note
Any visual information given here, including the example boards, are based on the CLI version of the game
Game board
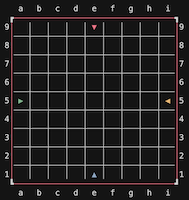
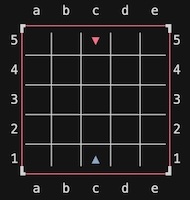
Corridor Quest is played on a game board consisting of squares and edges between these squares. The game board can be a different size for each game but width and heigh are always the same. Valid board sizes are 5, 7, 9, 11, 13, 15 and 17 with the default being 9. The coordinate system is chess notation. So, d3 means the square at column 'd', row '3'. The game board’s orientation is the same for everyone. The color of the board’s outer edge is to indicate the player who’s turn it is (see later)
Pawns
Each player is represented by a pawn which begins at the center square of one edge of the board. As a board always has 4 edges, a maximum of 4 players can play a game. However, it is also possible to play a 2 player game in which case the players always start at opposite sides (north and south). Pawns are color coded and use triangle shaped icons to represent direction and distinction for those that have trouble with colors.
note
Although, in theory, a 3 player is possible, it is not implemented as it gives unequal chances to the 3rd player.
Objective
The objective is to be the first player to get your pawn to any space on the opposite side of the game board from which you begin. The triangle shape of the pawn is a great hint to where its goal is. So, if your pawn is North you win when you are the first player to place your pawn on any of the squares on the most southern row of the board.
Walls
A wall is an object that can be placed between squares with the purpose of blocking a pawn's ability to move between those squares. Each player gets an initial amount of walls assigned to place them on the board. The exact initial amount depends on the board-size chosen when a new game is started. A wall has a length of 2 squares and can be placed either horizontally of vertically, but must stay fully on the board.
A wall coordinate also follows chess notation syntax, similar to the pawns. However a letter is added as a suffix to indicate the walls orientation: 'v' for vertical and 'h' for horizontal. For example, a wall placed at coordinate 'c3v' will be placed on the edges between squares 'c3', 'd3' and 'c4', 'd4'. The coordinate for a wall is the square that is closest to square 'a1'. Walls are, in the basic game mode, color coded in the same color as the pawn of a player. This means it is known during and after game play which player placed which wall, if any.
Walls have placement rules. A wall cannot be placed where another wall already is, either fully or partially. Also a horizontal wall cannot intersect a vertical wall. However, wall are allowed to align in any direction. The examples shown below give all ways walls are legally placed. One important rule is that the placement of a wall may never cause any player to be blocked from reaching its objective at the moment of placing. The system will validate all these rules before a wall placing is approved. Once a wall is placed it can neither be moved nor removed.
Move
A player can choose to move its pawn from one square to another square, but only in a strait line (north, east, south or west) and only one square per turn. The target square must be reachable:
- The edge between the current square and the target square must not have a wall placed in between.
- The target square must not be occupied by another player's pawn.

Jump
A player can jump 'over' another player's pawn if that pawns square is adjacent to the square of the players own pawn. One can only 'jump over a pawn' in a straight line (north, east, south, or west) if the path to the target square is unobstructed. This means:
- There is no wall placed on edges between the square where one's own pawn is and the square to jump to.
- The target square is not occupied by another pawn. You can only jump over a single pawn. If there are two pawns from opponents in a row you cannot jump over both.
- The target square is beyond the boards edge. You cannot jump over another pawn and end up outside the board.
Only if the jump path is obstructed is it allowed to jump diagonally, where the target square is on either side of the obstructing pawn and that square is not also obstructed by the same rules.
Finally and just to state the obvious: A player cannot jump over a wall.
Game Play
When a game starts, pawns are assigned to players at random. The first player is chosen at random as well.
A player must either move/jump its pawn or place a wall but not both. The game only progresses if either action is performed.
The next player is the one according to clock-wise orientation (north -> east -> south -> west).
There is no limit in the number of moves.
Although there is also theoretical no time limit for a player, stalling players are recognized by the system and encouraged to make a move and if they don't, will eventually be removed.
Users & Players
To be able to play a game, one must first become a User. This means you need to sign-up to become one first.
Only Users can participate in games as a player and interact with the system in general.
Some users are System Admin. They have abilities to manage many things. However,they can also participate in games as players like any ordinary user.
The user that creates a new game is automatically the Game Admin and its first player. Being game admin gives you some extra options in game management.
Game States
A game can be in any of the following states:
- Waiting: A game exists but waits for enough players to join it.
- Active. The game has started and game play is possible.
- Cancelled. The game has been cancelled. Game play is no longer possible.
- Finished. The game has a winner.
Any user can start a new game, which is then automatically placed in the Waiting mode. The new game is assigned a unique id called Game ID. The user that creates a new game, becomes the game's administrator as well as its first player.
Users can join games that are Waiting until there are enough players after which the game becomes automatically Active.
Players can always withdraw from a game. If the game was still Waiting it will need to wait for one more player again. If the game was already started, the game is Cancelled and game play is stopped. The game admin can always cancel a game, even a Waiting one. Cancelled games will be removed after some time by system maintenance.
The first player that has reached its objective is the winner and the game is then Finished. Scores will be calculated and stored for each player. All finished games remain available in full detail for users for later viewing.
Game visibility
A game is by default Public but can be made Private by the game admin.
When a game is Public, it is visible to all users. If it is Private it is only visible to its players.
note
Once a game is Active the setting can no longer be changed.
Invites
A user that creates a new Public game can optionally also invite other users. A unique invitation code is made available and users can use that code to join the game. The user can also simply communicate the Game ID to other users or wait for other users to join, as there is a way to get a list of Waiting games to join.
For a Private game an invitation code is always generated as the unique access key to the otherwise hidden game.
The user can decide to have the system send the invitation code to the invitees by email while creating the game or to communicate the invitation code by any other way of communication outside the system.
Messaging
The system maintains an in-game messaging system.
All game state changes and game actions generate a message to inform others.
Players can also create messages at any time while the game is played, either as an in-game broadcast (readable to all) or a Direct Message (DM) to one player (only readable by sender and receiver). There is a system-wide maximum of messages a player can create per game of 100 by default. (configurable by a system administrator).
Players can retrieve all in-game messages and their own DM's.
Users not participating can also retrieve in-game messages, but broadcast-only and only of Public games.
Wall Modes
There are two special game modes that are defined by the game administrator (the user that creates the game) and cannot be changed once the game is Active.
Masked Walls
Normally, each player has insights into these important pieces of information:
- Which player has placed which wall on the game board through the coloring of the walls.
- How many walls each player has left to be placed.
- An in-game message created on each wall placing.
A game with Masked Walls mode enabled is different in the following ways:
- Walls on the game board are visible but have the same neutral color, so players do not know who placed which wall (including their own)
- How many walls each player has left to be placed is hidden.
- There will not be an in-game message when a wall is placed.
The only way to keep track of who placed a wall is to keep notes after each and every move. However, there is a feature called private wall trading that might make your notes incomplete..
The neutral wall coloring and hiding of available walls for each player is only done while the game is Active. When the game is Finished all wall information is revealed as normal.
tip
When a player's turn is completed everyone is able to determine what the player did by examining what has changed on the board-game.
Invisible Walls
When this setting is enabled placed walls are completely invisible for the other players on the game-board, but are active as usual. This means players can only know where walls of other players are by bumping into them.
To aid players in their mental model of placed but invisible walls, every player is able to place and remove markers to note where they think (parts of) walls of opponents are. The notation system for markers is the same as for walls. However, a marker is not the same in size as a wall: A wall is placed between 2x2 squares but a marker is placed between 2 squares. So, a marker is half the size of a wall. Players can place or remove their own markers at any moment during game play. Players can also place as many markers as they think they need. Markers can only be used in this game mode. Players can only see their own walls and markers on the game-board during game-play. Users that are not players can only see pawns on the game-board.
When a game is finished, markers are retained and both users and players can see all walls and all markers. Walls and markers are colored. Markers are 'overlayed' over walls where a marker is placed on top of a wall. This gives players after-gameplay insights into their guessing performance.
note
In Invisible Walls mode the amount of still available walls per player is still displayed as normal and provides important information.
note
The Masked Walls and Invisible Walls game modes are independent from each other. When both settings are enabled Walls are invisible on the game-board and also the available walls per player is no longer available.
Wall Trading
Independent of game mode it is possible for players to trade walls among each other. This is an extremely strategic option that players can exercise at any moment during game play.
Wall trading is not free though. For each game variant the cost of a wall is determined at game start. This cost is used to calculate the final score of each player when the game is finished.
Wall trading is a two phase process:
Phase 1
One player makes an offer to either buy or sell a wall. Each transaction can only be exactly one wall and when the player makes a sell offer it must have that wall available. The offering will create an in-game message so other players know there is an offer on the table. However, the offering player can choose to make the offering private by creating a direct message (DM) to a specific opponent (only meaningful in a 4 player game).
Phase 2
Players that can read the offering message can make a trade that is compatible with the offer. A sell offer is transacted by a buy trade and a buy offer is transacted by a sell trade. If a trade is made one wall is moved from the available walls of the seller to the available walls of the buyer. On top of that the wall cost will be deducted from the final score of the buying player and added to the final score of the selling player.
note
- Multiple offers can be done by different players in the same game.
- Also, a player can have an offer outstanding while trading with another player.
- A player cannot have multiple offers outstanding.
The strategic aspect is that although the selling of a wall would help an opponent, one can increase their own score doing it and decrease the opponents score at the same time. Each player in the (possible) transaction must make up their mind if this is good for them or not.
note
- Offers can go unanswered.
- Offers can be withdrawn.
Trading cost
Each wall trade has a point cost that affects both players' final scores. The buyer loses points equal to the cost; the seller gains them.
The base cost depends on board size and player count. Smaller boards and fewer players make walls more decisive, so the cost is higher.
Base cost per wall
| Board | 2 players | 4 players |
|---|---|---|
| 5×5 | 8 | 6 |
| 7×7 | 7 | 5 |
| 9×9 | 6 | 5 |
| 11×11 | 6 | 4 |
| 13×13 | 5 | 4 |
| 15×15 | 5 | 3 |
| 17×17 | 4 | 2 |
Wall mode multipliers
If wall modes are enabled, the cost increases to reflect the extra strategic value of walls when information is hidden.
| Mode | Multiplier |
|---|---|
| Normal | 1.0× |
| Masked only | 1.3× |
| Invisible only | 1.5× |
| Masked + Invisible | 1.8× |
The final cost is base_cost × multiplier, truncated to an integer. You do not have to remember this or calculate it yourself. The wall cost is part of the full board display.
Game Variants
The game keeps scores (Quoridor does not). However, it proved difficult to implement, because you only introduce scores if you can compare scores between players. So, scores need to be comparable. The different variations we offer in game play have profound implications on scoring results such that scores in different variations are not comparable. So, things like highscores would then be meaningless.
This is why there is the concept of a Game Variant. Each unique combination of the following game settings is a game variant:
Scoring is comparable within each game variant. You will see this throughout the game. Highscores are given per variant. Leaderboards are per variant.
Notifications
As Corridor Quest is a turn based game that has no time limits it might take some time for each player to make progress in a game. Therefore, getting a notification when something happens in a game is essential. There are various facilities available to receive notification for various events.
event types
The following event types are available:
- 'turn' - occurs when a game the user is a player in has progressed and it is now the user's turn.
- 'action' - occurs when a game the user is a player in has an action: a pawn is moved or jumped or a wall is placed.
- 'game' - occurs when the status of a game the user is a player in is changed (active/finished/cancelled).
notification by mail
Users had to give their mail address when they signed up. This email address is used to send the notifications. A user can enable or disable email notification for each event type:
- 'turn' - Default: enabled
- 'action' - Default: disabled
- 'game' - Default: enabled
notification by ntfy.sh
ntfy.sh is a notification service with clients for all major platforms. It is a pub/sub mechanism: The game service 'pub'lishes notifications on topics (like games and users) and everyone using the app can 'sub'scribe to these topics to receive notifications on them. It is a great way to receive a push notification when something happened that you want to be notified about.
The service works by subscribing to topics. When an event occurs that concerns this topic you will receive a notification of this event. Because of the nature of this service not only users can subscribe to topics but everyone else, also non-users (spectators).
The topics that the game service send notifications about are:
- game - The topic is
game_[x]where [x] is the game-id for Public games and the invitation-code for Private games. - user - The topic is
[username]. Any game related event concerning this user will send a notification to this topic. For privacy reasons, events from Private games are not published to user topics, only to the game topic. Also, messages, broadcasts and DM will not be sent to the user topics. - DM - Direct Messages send to you directly in a game are treated differently due to the privacy aspect of it. You are able to configure a secret DM topic on your user account (see the user documentation of the client you are using). Only if you have set this, DM's will be send to this special topic.
The events that cause a notification to a topic are the same events as described in the event types section above. They are sent to the game topic and to the username topic.
In-game messages are also sent to the game_[x] topic with a tag of 'message' and can thus also be muted seperatly if needed.
Administrators can broadcast a system-wide message to all Active and Waiting games. This will also be sent as a notification to these games.
ntfy.sh supports tagging. The following tags are used:
- 'turn' - for events of event type 'turn'
- 'action' - for events of event type 'action'
- 'game' - for events of event type 'game'
- 'message' - for in-game messages
- 'broadcast' - for broadcast messages
- 'invitation' - for invitations for joining a game
- 'maintenance' - for messages that are cuased by system maintenance tasks
Ntfy.sh clients typically support different treatments per tag, such as muting. This way you can exactly configure which events get through and which not.
ntfy.sh supports priorities for notifications. Each tag has it's own priority:
- turn: urgent
- game: high
- action: default
- message: low
- broadcast: high
- DM: default
- maintenance: default
Scoring
Your score comes from two things: how far you've moved toward your goal, and how many walls you still have in reserve.
The basics
Progress — The closer you are to your goal line, the higher this part of your score. If you haven't moved at all, progress is 0. If you've reached your goal, progress is 1.
Wall efficiency — You start with a pool of walls. Each wall you place chips away at this part of your score. Save all your walls and you get full credit; use them all and this component drops to zero.
The game blends these two values using weights that depend on board size and player count. Bigger boards and more players shift the balance slightly toward walls, since they become relatively more valuable.
If you win (first to reach your goal line), you're guaranteed at least one point more than the highest-scoring opponent — even if the raw calculation would have tied or lost.
The math
Progress
progress = (start_distance − current_distance) / start_distance
where start_distance = board_size − 1 (the number of squares from your starting row to the goal).
Wall efficiency
wall_efficiency = (wall_capacity − walls_placed) / wall_capacity
If you traded walls during the game, wall_capacity reflects your current limit (not the original).
Combining them
base = progress_weight × progress + wall_weight × wall_efficiency
The weights are percentages that add up to 100. Look them up in the tables below.
Final score
Round the base to the nearest integer. If you're the winner and that rounded value isn't already higher than everyone else's, bump it up so you beat the next-best score by at least 1.
Weight tables
2 players
| Board | Progress | Walls | Starting walls |
|---|---|---|---|
| 5×5 | 87 | 13 | 4 |
| 7×7 | 86 | 14 | 8 |
| 9×9 | 85 | 15 | 10 |
| 11×11 | 84 | 16 | 13 |
| 13×13 | 83 | 17 | 15 |
| 15×15 | 82 | 18 | 18 |
| 17×17 | 80 | 20 | 20 |
4 players
| Board | Progress | Walls | Starting walls |
|---|---|---|---|
| 5×5 | 66 | 34 | 2 |
| 7×7 | 65 | 35 | 4 |
| 9×9 | 65 | 35 | 5 |
| 11×11 | 63 | 37 | 6 |
| 13×13 | 61 | 39 | 8 |
| 15×15 | 60 | 40 | 9 |
| 17×17 | 58 | 42 | 10 |
Wall trading penalty
If you've traded walls during the game, there's an additional adjustment. Each wall you acquired costs you points; each wall you gave away earns points back. The per-wall cost depends on board size, player count, and whether masked or invisible walls are enabled. See Wall Trading for details.
Clients
The game is developed as a so called client-server game: Multiple user can play against each other with a choice of game clients. To make this possible a server sits in the middle as the central coordinator where games are stored, scores are kept, etc.
Each user can choose which type of client suits best.
CLI Client
As a person who has worked a decent part of his live in Open Source the CLI client was (of course!) the first client made. It might be a bit alien to normal computer users these days that only know about the web and graphical user interfaces and apps and such, but the CLI was way before that time and is still widely used. If you do not know it, I invite you to try it out. See it as an adventure and an opportunity to learn something new!
CLI stands for Command Line Interface. It uses a terminal application to enter commands and, in the case of Corridor Quest, send those commands to a game server reachable over a network (typically the Internet). Other types of interfaces exist, like the GUI (Graphical User Interface) or the WebUI (Web User Interface) and Corridor Quest can and will have several other types of clients of various interface types to interact with the system. This section however, is about the CLI client.
The CLI client is meant for people that have a desktop/laptop Operating System like Linux, MacOS or Windows. All these operating systems have a tool available called a 'Terminal'. You have access to the CLI client using this 'Terminal'.
Before you can use the CLI client you first need to install it first.
General behaviour
The CLI client is called cq and follows normal semantics for CLI applications. At any level you can specifiy the argument --help to get help at that level. Example:
> cq --help
Usage: cq <COMMAND>

Commands:
  signup  Signup to a Corridor Quest server (create a user)
  login   Login to a Corridor Quest server
  logout  Logout from a Corridor Quest server
  server  Operations on the game server
  user    Operations on your user account
  game    Operations on Games
So, for example, entering cq user show wil give you information about yourself when you are logged in:
> cq user show

Username: alice
Email Address: alice@example.local
Notification method: Email
Notify on Turn: true
Notify on Action: false
Notify on Game: true
Active session
Password changed at: 2025-11-06 20:35:52.155293 UTC
'User' is the subject and 'show' the command. This is how it mostly works. Some often used commands, like login, etc, have been made available at the root level instead of under the 'user' where they semantically would belong. this is done for conviniance.
Commands can have arguments, their purpose is to give data in the context of the command. For example: cq user description "Alice from Wonderland" will change the description of the logged in user. "Alice in Wonderland" is the argument here.
> cq user description --help
Change User Description

Usage: cq user description <NEW_DESCRIPTION>

Arguments:
  <NEW_DESCRIPTION>  The new Description for the user

Options:
  -h, --help  Print help
Commands can have options. Their purpose is to give context to a command. For example: cg game show --game-id=43 here the subject is 'game', the command is 'show' and the only and mandatory option is --game-id with value '43' which is to provide the game-id of the game to show. Option have long and short forms. the short form for --game-id is -g, so cg game show -g1 is the same. Note that the long form always begins with '--' and the short form with '-'. cg game show --help (or -h) provides you with all options in their long and short form:
> cq game show --help
Show Game

Usage: cq game show --game-id <GAME_ID>

Options:
  -g, --game-id <GAME_ID>  The ID of the game to show
  -h, --help               Print help
auto-complete
The cli client supports a feature called auto-complete. You can, for example, only enter the letter 'cq' and a space and then enter tab. Then it will present the commands to choose from. The you can enter the first letter or letters of a command and press tob again and it will auto complete the command. This also works for options. just enter '--' and press tab. Just play a bit with it to get a feel for it. It is a great aid for fast and error free entry.
If auto-complete does not work for you, something went wrong during the installation. Reach out for troubleshooting.
Signup
> cq signup --help
Signup to a Corridor Quest server (create a user)

Usage: cq signup [OPTIONS] --server-url <SERVER_URL> --user-name <USER_NAME> --email-address <EMAIL_ADDRESS> --password <PASSWORD>

Options:
  -s, --server-url <SERVER_URL>        the url of the game service
  -u, --user-name <USER_NAME>          the unique identifier of the user
  -d, --description <DESCRIPTION>      An optional description of the user
  -e, --email-address <EMAIL_ADDRESS>  Email Address of the user
  -p, --password <PASSWORD>            The password for the user
  -n, --ntfy-dm-topic <NTFY_DM_TOPIC>  The optional ntfy DM topic
  -P, --profile <PROFILE>              The optional profile name
  -h, --help                           Print help
To be able to play games you need to become a user of the game system. To become a user you need to sign-up. To sign-up you need the following information:
- Username: must be unique within the system and maximum 10 long, among some other rules that will be checked by the system. If there is something wrong with your choice of username, you will be told what is problem is.
- Email-address: must be unique within the system and is checked to be a valid email address format. You need to be reachable at this address or signup cannot be completed.
- Description (optional): This is how you would like to describe yourself. It may be you full name, some fantasy name, or anything you like. Max 50 long. Tip: keep it decent.
- Password: This is the secret string you need to provide when you log into the system to prove you are who you claim to be. It has the usual restrictions.
- ntfy_dm_topic: This is an optional field. it is used to set a unique secret topic name to be able to send DM messages to you using the optional ntfs.sh notification service.
- Server (optional): This game is implemented as a Client-Server system. This is done to facilitate many clients from one central system across the network. However, there can be multple game servers available on the network. So, you need to make a choice to which game server you want to sign-up. If you do not give this information the client will choose the default living on https://server.corridor-quest.net.
tip
If you do not want to type in your password in clear text while signing up, just leave it out and the sign-up command will prompt you for it without echoing it back on the terminal.
When you signup an email is send to the specified email address with a verification code. See Verify.
You can optionally give a profile name. See Profiles for an explanation.
Login
> cq login --help
Login to a Corridor Quest server

Usage: cq login [OPTIONS] --user-name <USER_NAME>

Options:
  -s, --server <SERVER_URL>  The url of the game server (default: https://server-corridorquest.net, or CQ_SERVER env)
  -u, --user-name <USER_NAME>    The username
  -p, --password <PASSWORD>      The password (prompts if not provided)
  -P, --profile <PROFILE>        The optional profile name
When you are a user (you have signed up to a game server), you can login. This creates a session, which is a shared state between the client where you logged in and the game server. If you start another session between this user and the game server while the user is already logged in (for example from another device) this is possible, but the first session is then invalidated.
Most commands can only be done when the user is logged in. Exceptions are signup and password change. Both are protected by validation using a second factor.
As you can see above you need to provide 2 arguments: your username and your password. If you do not specify the password you will be prompted.
Again, the --server option is optional. If not given, the default is used.
Once you have successfully logged in, both username and server-url are stored in a local profile which means that for subsequent commands you do not need to supply them.
Game
> cq game --help
Operations on Games

Usage: cq game <COMMAND>

Commands:
  show         Show Game
  new          New Game
  list         List games
  join         Join game
  change       Change a game (GAME ADMIN only)
  cancel       Cancel (participation in) a game
  message      Operation on game messages
  move         Move your pawn
  jump         Jump your pawn over another pawn
  place        Place a wall
  mark         Mark an edge
  unmark       Unmark an edge
  offer        Offer a wall
  trade        Trade a wall offer
  leaderboard  Show Leaderboard
show
> cq game show --help
Show Game

Usage: cq game show --game-id <GAME_ID>

Options:
  -g, --game-id <GAME_ID>  The ID of the game to show
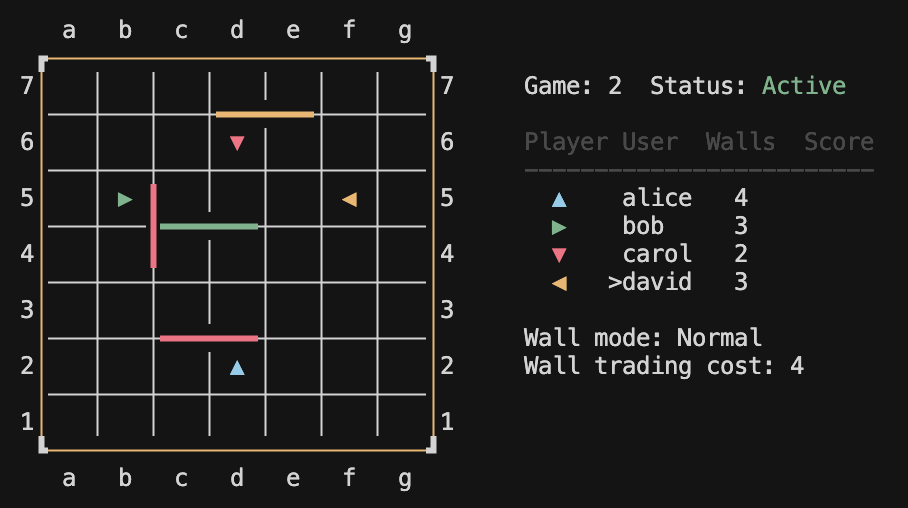
This command will most likely be the most used command of all. The reason is simple: it gives you a full rendering of the current situation in the game. Here is an example of an active 4 player game:
[TBC]
new
> cq game new --help
New Game

Usage: cq game new [OPTIONS]

Options:
      --invite [<USER_NAME>]
          Specify one or more times with a user name to send an invitation code to those users
  -p, --private
          Make this game private. Only players will see it, not others
  -n, --number-of-players <NUMBER_OF_PLAYERS>
          Number of players (2 or 4) [default: 2]
  -b, --board-size <BOARD_SIZE>
          Board size (5 to 17 uneven) [default: 9]
  -m, --masked-walls
          Players can not see who has placed walls and how many are left
  -x, --invisible-walls
          Placed walls are invisible
With this command a user can create a new game. As can be seen from the help output above you can specify the game variant, the visability and invite other users to this game. If you specify '--invite' the invitation code will be returned. If you specify usernames the system will send these users an email with the invitation code. This is optional, you can choose to send the invitation code to other users through any other menas.
list
> cq game list --help
List games

Usage: cq game list [OPTIONS]

Options:
  -s, --status <STATUS>  filter on game status [possible values: waiting, active, finished, canceled]
  -u, --user <USER>      filter on user, use 'me' for filtering on yourself
  -g, --game <GAME>      filter on player relation [possible values: admin, player, won, current]
With the list command you can get a listing of games. You can filter on game status and/or a user and the relation of that user as a player in these games. For example: 'cq game list -u me -g won' gives back all games that you have won.
 > cq game list

Game ID Status    Players  Size Private? Masked? Invisible? Won By     Players
      4 Active       2     5X5    No       No       No        ?        alice, >bob
      3 Active       4     9X9    No       No       No        ?        bob, >alice, carol, dave
      2 Finished     2    13X13   No       No       No      dave       carol, dave
      1 Finished     2     5X5    No       No       No      carol      carol, bob

> is current player
The list gives back the status, game variant, who has won the game (if _finished) and the players in the game.
note
As long as the game has status Waiting the game admin (the first layer of the game that has also created the game) can change most of this using the change command.
join
> cq game join --help
Join game

Usage: cq game join [OPTIONS] --game-id <GAME_ID>

Options:
  -g, --game-id <GAME_ID>                  The ID of the game to join
  -i, --invitation-code <INVITATION_CODE>  The invitation code of an invite-only game to join
With the join command you can join an existing game that is still in the Waiting state. If it is an invite only game wou also need to provide the received invitation code.
change
> cq game change --help
Change a game (GAME ADMIN only)

Usage: cq game change [OPTIONS] --game-id <GAME_ID>

Options:
  -g, --game-id <GAME_ID>
          The ID of the game to change
  -n, --number-of-players <NUMBER_OF_PLAYERS>
          Change Number of Players (2 or 4)
  -b, --board-size <BOARD_SIZE>
          Change Board Size (5 to 17 uneven)
  -m, --masked-walls
          Toggle Masked Walls setting
  -x, --invisible-walls
          Toggle Invisible Walls setting
  -p, --private
          Toggle Private setting
      --invite [<USER_NAME>]
          Specify one or more times with a user name to send an invitation code to those users
The game admin can change the above aspects of a Waiting game. The mandatory '--game-id' option specifies the game to change. If there are more than two players waiting in a 4 player game and the change is to a 2 player game, this is refused. If exactly 2 players are waiting, the game is started.
cancel
> cq game cancel --help
Cancel (participation in) a game

Usage: cq game cancel --game-id <GAME_ID>

Options:
  -g, --game-id <GAME_ID>  The ID of the game to cancel
If the game is Waiting and you are not the game admin, you are simply removed as a player. If the game is Active or you are the game admin, the game is Cancelled. This means playing is no longer possible and the game will be removed from the system during automatic regular and periodic system maintenance.
message
> cq game message --help
Operation on game messages

Usage: cq game message <COMMAND>

Commands:
  send  Send a message to a game
  list  List messages of a game
  mute  Set the mute state for a player in a game
move
> cq game move --help

You can use 3 methods to specify the move:
1. algebraic notation. For example: 'e4' means column e, row 4
2. compass notation ('north', 'south', 'west', 'east')
3. directional notation ('up', 'down', 'left', 'right')

Usage: cq game move --game-id <GAME_ID> <TO>

Arguments:
  <TO>
          The position to move to

Options:
  -g, --game-id <GAME_ID>
          The ID of the game to move the pawn
One of the actions you can do when it is your turn in the game is 'move' your pawn according to the game rules. As you can see from the command's help output above there is 3 ways to specify a move. Most people will most likely use the relative directional options (compass and directional), as they are the most intuitive. The absolute chess based notation is mostly used by automatic interfaces.
jump
> cq game jump --help

You can use several methods to specify the jump:
1. algebraic notation. For example: 'e4' means column e, row 4
2. compass notation ('north', 'south', 'west', 'east')
3. compass diagonal notation ('north-west', 'north,east', 'southwest', 'east-south', etc)
4. directional notation ('up', 'down', 'left', 'right')
5. directional diagonal notation ('up-left', 'up,right', 'down-left', 'downright', etc)

Usage: cq game jump --game-id <GAME_ID> <TO>

Arguments:
  <TO>
          The position to move to

Options:
  -g, --game-id <GAME_ID>
          The ID of the game to move the pawn
Like with move there are several ways to specify the location to move to and they are explained above in the command help output. There are specific game rules for jumping.
place
> cq game place --help

General:
You need to use algebraic notation for the placement.
For example: 'e4v' means column e, row 4, orientation vertical
You always use the top-left most coordinate, for example:
e4v means a wall vertically placed between columns e and f spanning rows 4 to 5
'c3h' means a wall horizonally placed between rows 3 and 4 spanning columns c to d

Usage: cq game place --game-id <GAME_ID> <ON>

Arguments:
  <ON>
          The top-left coordinate to place the wall (example: e4v)

Options:
  -g, --game-id <GAME_ID>
          The ID of the game to move the pawn
For wall placement only the extended chess notation can be used. There are specific placement rules for walls.
mark
> cq game mark --help
General:
You need to use algebraic notation for marking an edge.
For example: e4v means column e, row 4, orientation vertical
You always use the top-left most coordinate, for example:
e4v means a wall vertically placed between columns e and f
c3h means a wall horizonally placed between rows 3 and 4

Usage: cq game mark --game-id <GAME_ID> <COORDINATE>

Arguments:
  <COORDINATE>
          The top-left coordinate to mark an edge (example: e4v)

Options:
  -g, --game-id <GAME_ID>
          The ID of the game to mark an edge
This command is only available if the game is active and has Invisible Walls enabled. This means opponents walls are not visible on the game-board. To help you to keep track of where you think their walls are, you can mark edges. A mark is only one square in length as opposed to walls, which are 2 squares in length. Whenever you show the game you will see only your walls and your marks. You can mark edges whenever you like: you do not have to wait until it is your turn. You can also mark as many edges as you like. You cannot place a mark on on of your own walls. Also, when you place a wall where marks are, those marks will be removed. See marks as a personal notepad. When the game is Finished, invisability mode is disabled and you see all walls again, color coded by player and with you marks as an overlay, so you can see which marks you had right and which not.
unmark
> cq game unmark --help
General:
You need to use algebraic notation for unmarking an edge.
For example: e4v means column e, row 4, orientation vertical
You always use the top-left most coordinate, for example:
e4v means a wall vertically placed between columns e and f
c3h means a wall horizonally placed between rows 3 and 4

Usage: cq game unmark --game-id <GAME_ID> <COORDINATE>

Arguments:
  <COORDINATE>
          The top-left coordinate to mark an edge (example: e4v)

Options:
  -g, --game-id <GAME_ID>
          The ID of the game to unmark an edge
This is the opposite of mark. You can remove previously made marks. Here too, you can do this any time.
offer
> cq game offer --help
Offer a wall

Usage: cq game offer --game-id <GAME_ID> <TRADING_MODE> [TRADING_PARTNER]

Arguments:
  <TRADING_MODE>     Trading mode (Selling or Buying) [possible values: buying, selling]
  [TRADING_PARTNER]  Trading partner

Options:
  -g, --game-id <GAME_ID>  The ID of the game to offer a wall
This command is part of the wall trading functionality. You can either offer to buy or offer to sell. You can only sell if you have walls availabile to sell. This will create an in-game broadcast message
You can optionally specify an opponent in the game as a trading partner. This will make the offer private and the offering message is only visible for the trading partner. This is known as a Direct Message (DM).
trade
> cq game trade --help
Trade a wall offer

Usage: cq game trade --game-id <GAME_ID> <TRADING_MODE> <TRADING_PARTNER>

Arguments:
  <TRADING_MODE>     Trading mode (Selling or Buying) [possible values: buying, selling]
  <TRADING_PARTNER>  Trading partner

Options:
  -g, --game-id <GAME_ID>  The ID of the game to trade a wall offer
This command is part of the wall trading functionality. If an opponent has made an offer to either buy of sell, you can make the trade. If the offer is to buy and you want to trade, you need to have a wall available to sell it.
If the offer has been made in private to you, you need to specify the trading partner being the offering opponent.
Making a trade has a cost that will be incorporated in the final score when the game is finished. The specific cost depends on the game variant. The show command for the game disaplays the wall cost.
leaderboard
> cq game leaderboard --help
General:
Leaderboards are per unique combination of board size,
number of players, masked walls and invisible walls.
This is because scores must be comparable for a leaderboard

Usage: cq game leaderboard [OPTIONS]

Options:
  -b, --board-size <BOARD_SIZE>
          Board size (5 to 17 uneven)

          [default: 9]

  -n, --number-of-players <NUMBER_OF_PLAYERS>
          Number of players (2 or 4)

          [default: 2]

  -m, --masked-walls
          Masked walls

  -i, --invisible-walls
          Invisible walls
This command show the max 10 users with the heighest scores in a Game Variant. The options are to specify the game variant with a default for each one. It also shows the game-id's of the game's where those scores were made (except if the game is private).
Logout
> cq logout --help
Logout from a Corridor Quest server

Usage: cq logout
This command logged you out of the game service in the session file. The session file wil also be removed.
User
% cq user --help
Operations on your user account

Usage: cq user <COMMAND>

Commands:
  password       Change password
  email-address  Change Email Address
  verify         Validate security sensitive actions
  description    Change User Description
  username       Change User Username
  show           Show User
  notify         Change notification settings in participating games
  ntfy_dm_topic  Change the ntfy.sh topic for DM's of the user (keep secret)
  profile        Operation on profiles
  theme          Change user theme
password
> cq user password --help
Change password

Usage: cq user password [OPTIONS] <NEW_PASSWORD>

Arguments:
  <NEW_PASSWORD>  The new password of the user

Options:
  -s, --server-url <SERVER_URL>  The server url
  -u, --username <USERNAME>      The username of the user
You use this command to change your password. This is a special command in two ways:
- If you have forgotten your password you can not log in. So, for this command you do not need to be logged in. For that reason, you must give the username as a mandatory option
- This is obviously a security sensitive operation. For this reason a verification code is send to the known email address of this user. Only when this verification code is entered using the verify command from the same computer and user will the password change be completed.
email-address
> cq user email-address --help
Change Email Address

Usage: cq user email-address <NEW_EMAIL_ADDRESS>

Arguments:
  <NEW_EMAIL_ADDRESS>  The new Email Address of the user
You use this command to change your email address. You need to give the new email address as an argument. This command, like password, is also special:
- Unlike password you must be logged in for this command.
- Like password you will be send a verification code to the NEW email-address. We send it to the new email-address in case the old email-address is no longer working for some reason. An informational email is send to the OLD email-address. Only when the received verification code is entered using the verify command from the same computer and user will the email-address change be completed.
verify
cq verify --help
Validate security sensitive actions

Usage: cq verify --code <VERIFICATION_CODE>

Options:
  -c, --code <VERIFICATION_CODE>  The verification code
The verify command is used to verify security sensitive operations. There are three:
- Signup
- Password change
- Email address change
When any of the above commands are performed, an email is send to the (new) email address with a unique verification code and this code needs to be entered using this command to confirm the requested action. When the verification code entered is wrong then the user can retry max 2 times. After that the account is locked and the user needs to contact a system administrator.
description
> cq user description --help
Change User Description

Usage: cq user description <NEW_DESCRIPTION>

Arguments:
  <NEW_DESCRIPTION>  The new description for the user
Each user has an optional description. You can put anything you like in here, but please keep it decent.
username
> cq user username --help
Change User Username

Usage: cq user username <NEW_USERNAME>

Arguments:
  <NEW_USERNAME>  The new Username of the user
We acknowledge a username is for some an important way to express themselves. As such we provide the option to change it. You do need to be logged in for this though. There is no reason to re-login. New sessions do need to login using the new username. Of course the new name must be unique. All references to the old name in the system are changed to the new name.
This change will notify subscribers to the old username topic in the ntfy.sh notification service (if configured).
show
% cq user show --help
Show User

Usage: cq user show [OPTIONS] [USER_NAME]

Arguments:
  [USER_NAME]  Optional: The name of the user

Options:
  -s, --highscores  Include the users highscore for each game variant
When done without a username argument it will show user related data about yourself. If you do give a username, you get to see that users information, but only what is publicly available.
This command has an option '--highscores' which will provide a table with the highest score this user has reached in each [game variant], together with the id of the game where the user did that (unless the game is private).
notify
> cq user notify --help
Change notification settings in participating games

Usage: cq user notify <--game|--action|--turn>

Options:
  -g, --game    Toggle game status change notifications (active/finished/cancelled)
  -a, --action  Toggle action notifications (any pawn move or wall placement)
  -t, --turn    Toggle notification when it is your turn
As the game is a turn based game, it might take some time, like with chess, that your opponents will make a move. So, the system provides various ways to notify you when something of interest is happening so you can do more meaningfull things with your life than waiting on others. You can define what is of interest for you: what do you want to be notified about? The help text for the command is quite clear on the possibilities.
'cq user show' will show you what the current settings are and with the nofify command you can toggle the setting.
ntfy_dm_topic
> cq user ntfy-dm-topic --help
Change the ntfy.sh topic for DM's of the user (keep secret)

Usage: cq user ntfy-dm-topic --ntfy-dm-topic <NTFY_DM_TOPIC>

Options:
  -n, --ntfy-dm-topic <NTFY_DM_TOPIC>  The topic of the user for DM's in ntfy.sh (keep secret)
Set or change the topic for ntfy.sh notifications for DM's. As DM's (Direct Messages) are private, you schould choose a topic that is hard to guess. Regard it as a password or secret. If you do not set this topic, DM's will not be send to ntfy.sh.
profiles
> cq profile --help
Operation on profiles

Usage: cq profile [COMMAND]

Commands:
  list    List Profiles
  switch  Switch Profile
When a user interacts using the CLI client a 'default' profile is stored on the local filesystem in the OS specific application folder. This profile is a file that holds the state of the user, like the gameserver's URL, the username, acces tokens, etc.
With some commands, like with signup and login it is possible to specify a separate profile using the -P or --profile argument. this gives the possibility log-in multiple times using different combinations of username and server. There are two different ways to switch to another profile:
- Using the
cq profile switch <name>command. this is a permanent switch which means all subsequent commands will use that profile. - Using an environment variable CQ_PROFILE. For example
CQ_PROFILE=<name> cq user showis executing the commanduser showwith profile. This does not switch the profile permanently.
The profile system gives users the possibility to play games on multiple gameservers from the same client or play as different users on the same game server (although that will typiccally only be used for testing purposes)
theme
> cq user theme --help
Change user theme

Usage: cq user theme <NEW_THEME>

Arguments:
  <NEW_THEME>  The new theme of the user [possible values: dark, light, translucent]
The CLI client provides a number of themes. a theme is a set of colors for the various objects in the game: pawns, walls, borders, etc. This is to provide the user options depending on the situation in which the player plays the game, such as at night or in a terminal that has an unconvient foreground/background setting. Possible values are: 'dark', 'light' and 'translucent'. You need to try them out and choose one to your liking.
Server
Info
> cq server info --help
Get information about the server

Usage: cq server info [OPTIONS] --server-url <SERVER_URL>

Options:
  -s, --server-url <SERVER_URL>  the url of the game service
  -m, --motd                     the message of the day
  -a, --admin                    the email-address of the main system administrator
  -n, --nfty                     the url of the nfty.sh service
This command gives you general information about the game server. You do not need to be logged in. Choices are in the command help above. The administrator email address is for occassions where you have yourself locked out and need help.
Web Client
To be developed, sorry!
CLI Client
If you want to follow players or games as a spectator without becoming a user: you can!
Anonymous commands
Some commands can be used without a user account. These are called anonymous commands.
For these anonymous commands an optional --server is added. You only need this is you want to query another server than the default game server at https://server.corridor-quest.net.
When you specify a different server, either using --server or using the environment variable CQ_SERVER, this will be stored as your new default server and used if you do not specify a server.
game list
The ability to list games using various selection criteria. Only the "me" functionality (where you can filter on your own games) is not available because you are not a player or games.
game show
All functionality of this command is available.
game leaderboard
All functionality of this command is available.
user show
All functionality of this command is available, however, as an anonymous, you must provide a username to get information about (including highscores)
server info
All functionality of this command is available.
Notifications
Independant of this, you can be notified of events using the notification system without being a user or player.
WEB Client
(to be developed)
Server
This section is only relevant if you want to run your own game server. You do not need the server component to play the game. The clients are by default configured to use the server available at https://server.corridor-quest.net.
Installation
The game server is called cq-server and is (currently) only available as a container image. To pull the container image user one of the following commands:
# podman pull codeberg.org/corridor-quest/cq-server
# docker pull codeberg.org/corridor-quest/cq-server
cq-server requires a bunch of environment variables to be set up. It depends on your container runtime how to set these up. Some of these you should regards as secrets.
You find all the environment variables here. Most have default values.
Database
cq-server expects an empty postgreSQL database and an account within PostGreSQL thas has write access ti this database and is able to run migrations.
cq-server needs to be able to send e-mails for various functionality, among some critical functions like sending verification codes for signing up, etc.
Tested versions:
- PostGreSQL: v18
- ntfy.sh: ?
Configuration
The server component is delivered with a dotenv file. This file describes all the environment values one can configure to influence the way the server runs. Where defaults are this is also documented inside the file. These values need to be created/overruled as environment values before the server starts. Depending how the server component runs there are specific ways to do this:
- For RPM/DEB based: a systemd unit file is deployed that will read the dotenv file. consult the unit file for the exact location of the doting file.
- For OCI Container based: Both Podman and Docker provide several ways to load env's from files and even separate some out as secrets.
- For Kubernetes based: create a config-map that contain all the envs. Also one can use the secrets facility of Kubernetes.
note
Which of the envs need to be regarded as secrets is up to the administrator
Initial Admin User
There is a special procedure to be followed to create the first system administrator:
-
When the server starts up for the first time (so with an empty database) or when the env INIT is true, the admin user is (re)created in the database with the username and email address from the env's and a randomly generated password.
-
After this you can use the command cq user password on this user to change the password to something you known. A verification code will be send to the admin user's email address and needs to be entered using the cq user verify command
Maintenance
Backup database (online)
podman exec postgres pg_dump -Fc -U postgres cq | gzip > game_db_backup_$(date +%Y%m%d).dump.gz
Restore database
gunzip < game_db_backup_<yyyymmdd>.dump.gz | podman exec -i postgres pg_restore -U postgres -d cq
ntfy.sh
Corridor Quest optionally supports a ntfy.sh service to send notifications to. You can use any ntfy.sh service you want.
If you want your own ntfy.sh service for your installation you need to configure that yourself. Full documentation for self serving ntfy.sh is here.
We run a ntfy.sh service on https://ntfy.corridor-quest.net which is for our own game service that lives on https://corridor-quest.net:3001
If you do choose to deploy your own ntfy.sh service accompanying your own game server, you also need to configure the relevant ENV's in the server config.
Admin tool
Installation
The admin tool is called cq-admin and is available for Linux and MacOS.
Linux
For Linux the following installation options are available:
For RPM based distributions look here
For Debian based distributions look here
For other distro's there are tarballs available for both x86_64 and arm64 here
MacOS (Homebrew)
First time: Add the Corridor Quest tap:
brew tap corridor-quest/tap https://codeberg.org/corridor-quest/homebrew-tap
First time: Install the player client:
brew install cq-admin
Updating:
brew update
Verify installation
To verify proper installation enter these commands in a terminal session:
cq-admin --version
cq-admin --help
User Management
Player Management
Management
Notification
ntfy.sh
Cossidon Quest supports ntfy.sh.
Corridor Quest tries to read these environment variables:
- NTFY_URL. This is the full url, so including port, to the ntfy service
- NTFY_USER. This is the username to use to publish
- NTFY_TOKEN. This is the token to use
If NTFY_URL is present and either NTFY_USER or NTFY_TOKEN is not, it is assumed the ntfy service has not implemented access control.
Architecture
Introduction
Corridor Quest (cq in short) is developed as a client server application.
Server component
The server component executable is called cq-server. It is a cloud native implementation. it has an API first design and the API is RESTful. This means you can run multiple instances of the server component behind a proxy / load balancer. It is also available as a container image so you can run it using Podman for example. It also comes with a helm chart to be able to run it on Kubernetes.
The server component requires a PostgreSQL database. It has been tested with PostGreSQL v18 only currently. The location of the database is define by an environment variable DATABASE_URL which defines all needed information in its string. An example is:
The API is self documenting using OpenAPI and Swagger UI. the relative url's for the API documentation are as follows:
- for Swagger UI: /api-docs (for example: https://cq.example.com:3000/api-docs)
- for the OpenAPI JSON spec (for example: https://cq.example.com:3000/api-docs/openapi.json)
The server accepts either http or https inbound connections as controlled by environment variable REQUIRE_HTTPS. https is strongly advised as passwords are otherwise send in clear text over the wire. https configuration can be in one of three ways:
- Direct https with a valid certificate
- X-Forwarded-Proto header (common in reverse proxies)
- RFC 7239 Forwarded header
Server logging is sent to standard out. Log level is controller by an environment variable LOG_LEVEL. Meaningfull values are INFO and DEBUG.
Repositories
API
Coding Standards
Vibe coding policy
In the beginning I used LLM's only sparingly. Mainly as a tutor to learn Rust concepts which I then would apply myself. As the development progressed I used it more and more, also as a research tool.
I used VS Code as my IDE and experimented with some LLM extensions. That is where things went wrong. I gave them access to the codebase and they made a mess of it. That was a good lesson. I only used LLM's in a chatbot since and copy-pasted what I deemed was good and adjusted as needed. That was painful but safe.
About halfway development I got the change to use cursor.ai with Claude Code and never looked back (for coding). I set it up such that it would never make code changes by itself, but giving it full visibility into your codebase is a godsend.
As my trust in Claude Code grew I let it do tedious work in the codebase. Boilerplate stuff mainly. For design work I use it as a tutor/mentor again. I also use it as a research tool to investigate what is idiomatic in certain topics, like api design and such.
This is not what I would define as vibe coding. That is letting an LLM build everything from a description you give. As a 'safe' experiment I did let cursor.ai completely implement all unit and api tests for the server component. IT is safe as it does not touch the main code, and it takes the tedious work of maintainting test from me. It produced more code than the game itself, but that kind of makes sense as there are a lot of corner cases and api endpoints to test.
cq-server
cq-server is structured per resource (user, game, player,etc) with 3 layers:
- The API layer
- The Service layer
- The DB layer
when an api call comes in it is handled by the router at the start of the resource specific rust file inside the handlers folder. This router calls the handler function in the same file. This handler function typically has the following structure:
- api-doc
- the function signature with garde's where possible
- the access check. this will check is the user has permission to call this api endpoint and if it does, fetches the user record of the requester.
- call the service in the service layer
- format and return results if appropriate
The service layer for each resource contains all service functions for that resource. Aservice is typically structuered like this:
- Validations. run service specific validations. Abort when violated.
- Do transformations that are functionally needed
- Make changed to the DB using calls to the DB layer.
- Report where apprpriate (messages, emails, notification)
- Return to the API layer with return data where appropriate.
The DB layer takes care of all the SQL calls to the DB for whatever the services need.
Each layer can have helper functions. They are typically at the bottom of the files.
Testing
I decided to make tests the domain of 100% vibe coding. the coding assistant has full write access to cq-server/src/tests. Inside are both unit and api tests.
- Unit tests are made for testing the game rules in various (edge) cases.
- API tests are end-to-end tests that test the api, service and database layer in cq-server.
When a change is made somewhere, I make the coding assistant aware of this and ask it to refactor the tests accordingly.
The test frameworks uses a separate test database for a run which will be created as part of the test run. The unit test is made to be very fast as it is in memory. the Api tests are comparatively slow as it tests all layers.
Releasing a New Version
This guide covers all the steps needed to release a new version of Corridor Quest to Codeberg, making it available to users via package managers and direct downloads.
Prerequisites
- Push access to the Corridor Quest repositories on Codeberg
CODEBERG_TOKENsecret configured in each repository withwrite:repositoryandwrite:packagepermissions- All tests passing locally
- All changes committed and pushed to
main
Release Process
Step 1: Update Version Numbers
Update the version in Cargo.toml for each crate that has changes:
# cq/Cargo.toml
[package]
version = "X.Y.Z"

# cq-admin/Cargo.toml
[package]
version = "X.Y.Z"

# cq-server/Cargo.toml
[package]
version = "X.Y.Z"

# cq-common/Cargo.toml (if changed)
[package]
version = "X.Y.Z"

# cq-client/Cargo.toml (if changed)
[package]
version = "X.Y.Z"
Step 2: Update Changelog (Optional)
Update CHANGELOG.md in each crate with notable changes for this release.
Step 3: Update offline sqlx file
cd  /path/to/corridor-quest/cq-server
cargo sqlx prepare -- --all-targets --all-features
Step 4: Commit Version Changes
cd /path/to/corridor-quest
git add -A
git commit -m "Bump version to vX.Y.Z"
git push
Step 5: Create and Push the Tag
git tag vX.Y.Z
git push origin vX.Y.Z
This triggers the CI workflows automatically.
What Happens After Tagging
The CI workflows are designed to be fully automated and idempotent (safe to re-run).
Workflow Structure
Each release workflow (cq, cq-admin) follows this sequence:
-
create-releasejob (runs first):- Checks if release exists for the tag
- Creates release if it doesn't exist
- Outputs
release_idandversionfor other jobs
-
Build jobs (run in parallel after
create-release):build-linux-arm64: Cross-compiles for ARM64build-linux: Builds for x86_64 Linuxbuild-windows: Builds for Windows (cq only)- Each job:
- Deletes any existing assets for its platform
- Uploads new assets
- Saves checksums as artifacts
-
update-release-notesjob (runs after all builds):- Collects all checksum artifacts
- Updates release notes with complete checksum list
Artifacts Produced
For cq and cq-admin:
- Linux x86_64 tarball + DEB + RPM
- Linux arm64 tarball + DEB + RPM
- Windows x86_64 zip (cq only)
- SHA256 checksums in release notes
For cq-server:
- Multi-arch container image (amd64 + arm64)
- Tagged as both
vX.Y.Zandlatest
Package Registries Updated
- Debian:
aptinstallable packages - RPM:
dnfinstallable packages - Generic: Tarballs with stable "latest" URLs
Re-releasing a Version
The workflows support re-releasing. Each platform's build job will:
- Delete its existing assets from the release
- Upload fresh assets
- Update checksums
To re-release:
# Delete local and remote tag
git tag -d vX.Y.Z
git push origin :refs/tags/vX.Y.Z

# Optionally delete the release via Codeberg web UI
# (not required - CI will reuse existing release)

# Re-create and push the tag
git tag vX.Y.Z
git push origin vX.Y.Z
Verifying the Release
After CI completes (usually 15-30 minutes), verify:
-
Releases page: Check
https://codeberg.org/corridor-quest/<repo>/releases- All expected assets should be listed
- Release notes should have all checksums
-
Container images:
podman pull codeberg.org/corridor-quest/cq-server:vX.Y.Z -
Package registries:
# Fedora/RHEL
dnf info cq

# Debian/Ubuntu
apt show cq
Troubleshooting
CI fails at "create-release" job
- Check that
CODEBERG_TOKENsecret is set in repository settings - Verify the token has
write:repositoryandwrite:packagepermissions - Check the CI logs for the API response
Build jobs fail but create-release succeeded
- The release exists, so you can re-push the tag to retry
- Check specific build logs for compilation errors
Assets uploaded but checksums missing
- The
update-release-notesjob may have failed - Check if all build jobs completed successfully
- Checksums are collected via artifacts, so all builds must finish
Package registry returns 409
- This is OK - means package already exists
- For DEB/RPM registries, same version can't be overwritten (by design)
Container image build fails
- Check that
CODEBERG_USERNAMEsecret is set - Verify arm64 cross-compilation completed
- Check buildah/podman logs
User Installation After Release
Once released, users can install via:
Linux (Fedora/RHEL)
dnf config-manager --add-repo https://codeberg.org/api/packages/corridor-quest/rpm/cq.repo
dnf install cq
Linux (Debian/Ubuntu)
echo "deb https://codeberg.org/api/packages/corridor-quest/debian bookworm main" | sudo tee /etc/apt/sources.list.d/corridor-quest.list
sudo apt update
sudo apt install cq
Container (cq-server)
podman pull codeberg.org/corridor-quest/cq-server:latest
# or specific version
podman pull codeberg.org/corridor-quest/cq-server:vX.Y.Z
Direct Download
Tarballs and packages are available at:
- Releases:
https://codeberg.org/corridor-quest/<repo>/releases - Latest:
https://codeberg.org/api/packages/corridor-quest/generic/<pkg>/latest/